
Quick-links:
Quick-links:
Using other shields shouldn't be a problem - after all, it is stackable. But for this walkthrough it keeps everything simple if it's just the Arduino and the TellyMate Shield.
The TellyMate Shield should arrive 'ready to go':
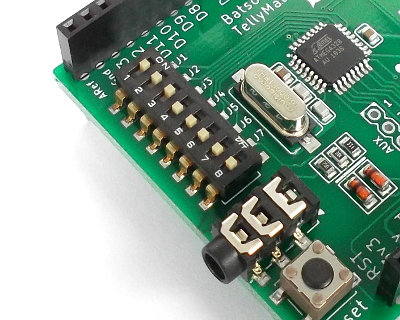
56k7 baud [J1-3], NTSC output [J6 is OFF]

56k7 baud [J1-3], PAL output [J6]
Note: (The colour of the jumpers doesn't matter!)
We do try to set J6 according to the country your order came from, but we might make mistakes.
A more detailed description of jumper settings can be found in the TellyMate User Guide.
Quick Answer: America and Japan use NTSC, everyone else uses PAL.
Longer Answer: Have a look at the map on wikipedia's PAL page.
SECAM areas (e.g. France) should be configured for PAL (e.g. a jumper on J6)
Brazil should be configured as 'NTSC' (even though their colour information is PAL encoded) as they use a 525 line system.
Many more modern TVs will be able to handle both PAL and NTSC anyway.
Ensure that your Arduino is unpowered and the USB/Serial cable is disconnected.
Carefully line up the pins on the bottom of the TellyMate Shield to the sockets on the top of the Arduino and gently push it home.
The TellyMate Shield should connect to any PAL or NTSC TV which has a composite video phono/RCA input. These are usually yellow. A suitable cable is provided.
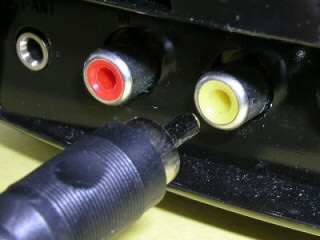
TV Connection
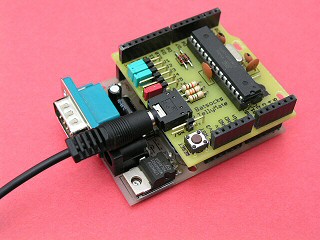
TellyMate Shield with lead connected
Note: Your Arduino will be better looking than ours. We made ours one evening mostly from parts in our "'scavenged-parts-bin" box. It's not overly photogenic. Sorry.
Turn on the TV.
Turn on the Arduino.
Switch the TV to the composite input - sometimes called 'AV' input. Try pressing this button on your remote:

Depending on what sketch you last had on your Arduino (if any), you should see one of the following:
Any one of these is good.
Now you've got the leads connected and the TV ready, it's time to try some sketches.
The following sketch will display "Hello World" on your TV screen:
/* Example Sketch for a TellyMate Shield */
/* Hello World */
void setup()
{
    Serial.begin( 57600 ) ;
    Serial.println( "Hello World!" ) ;
}

void loop()
{
    // do nothing!
}
Upload this sketch to your Arduino. When the sketch runs, there will be a line of text at the top of your TV saying "Hello World"!
Note: Whilst the sketch is being loaded onto the Arduino, any communication between the Arduino and the PC will be displayed by the TellyMate - this 'random text' is harmless and will only appear when sketches are being loaded to the Arduino.
The following sketch uses a couple of the control sequences that are documented in the User Guide.
In the setup() function, the serial communication is initialised, the screen is cleared (<ESC>E), and the blinking cursor is switched off (<ESC>f).
In the loop function(), A random (printable) character is output at a random location on the screen (using <ESC>Yrc).
/* Example Sketch for a TellyMate Shield */
/* Random Characters */

/*
Revision history:

version 2
18th Feb 2012
Modified for Arduino 1.0 (replaced Serial.print with Serial.write where necessary)
*/

/* Simple helper functions */
#define CHAR_ESC '\x1B'
void cursor_move( uint8_t row , uint8_t col )
{ // <ESC>Yrc
  Serial.write( CHAR_ESC ) ;
  Serial.write( 'Y' ) ;
  Serial.write( 32 + row ) ;
  Serial.write( 32 + col ) ;
}

void cursor_show( bool show )
{ // <ESC>e or <ESC>f
   Serial.write( CHAR_ESC ) ;
   Serial.write( show?'e':'f' ) ;
}

void screen_clear( void )
{ // <ESC>E
  Serial.write( CHAR_ESC ) ;
  Serial.write( 'E' );
}

/* The actual sketch */
void setup()
{
  Serial.begin( 57600 ) ; // set to 57600 baud
  screen_clear() ;
  cursor_show( false ) ; // turn the cursor off
}

void loop()
{
  //move the cursor to a random place on the screen.
  cursor_move( random( 25 ) , random( 38 ) ) ;

  // print a random character.  Characters below 31 need special handling, so (for simplicity) use values between 32 and 255
  Serial.write( random( 32, 256 ) ) ;
     // the (unsigned char) cast ensures that the int returned by random() is treated as a char when passed to Serial.print().
     // without the cast, the Serial.print function will display the int value as a number on the screen rather than the character with that value.
}
Upload this sketch to show random characters being sprayed onto the screen.
Start playing!
If you need any more information on how to control the output, head towards the User Guide.
If you want to show off what you've done with your TellyMate - send us a picture and tell us all about it. We'd love to hear from you.
If you have any comments, please let us know. You can email us here at batsocks.co.uk using our "feedback" email account.